Showing posts with label Die cut. Show all posts

Tuesday, April 9, 2024

Shower Me with Sunshine!!

 You might have guessed already but at Shopping Our Stash we want to see projects pertaining to a Baby Shower or a Bridal Shower being April I'm sure there are lots of June brides hoping their maid of honour is going to throw them a shower, well it doesn't matter what time of year there is someone expecting a little one. In this day and age there is rarely a generic shower as most expectant parents want to know whether it is a boy or girl.  With that being said I chose Baby Shower. 


I went with a very simple card so the train shines. I have had this die used it once for a shower card for my great grandson who will be 7 years old this year. I cut it 3 times from white cardstock, coloured the animals with markers and layered them for stability then cut the train from blue cardstock and trimmed off the animals and added it as the top layer, the enamel hearts are from the Eyelet Outlet also from the 2017 era. Sentiments were computer generated. Nothing on my card is younger than 2 years old.


Close up of the train.


Closer look at the rest of the train.

I am entering this in a new to me challenge:


Thanks checking my blog today and don't forget to check out the MAiN BLOG to see what the rest of the design team have made, then shop your stash and add a baby or bridal shower project to our gallery.


Tuesday, February 27, 2024

It's Not Easy Being Green..............

 Hello and welcome to a NEW challenge at Shopping Our Stash as Kermit always says...It's not easy being Green which is our challenge for the next fortnight. We want to see projects that are mostly green. Sounds like an easy peasy challenge unless you are green challenged as I am except I love lime green so that is what I decided to use for my card. 


Since we were shopping our stash I dug deep for long retired Gable Green cardstock and ink as well as Green Galore for the mat and die cut. I tried a new technique with the 3D folder, ink the debossed side, spritz and run it through the big shot, I feel it doesn't have enough dimension next time I will add a shim so the embossed parts are sharper and maybe go heavier on the ink.


Finished the inside with a cling stamp from Stampendous, a couple of scraps and a trio of rhinestones.

Here is the proof of the age of my ink and cardstock.

The ink pad is the really old style and I was surprised it wasn't totally dry.

 I am adding this to:

Seize the Birthday ~~ Anything goes

Thanks for checking today and don't forget to check out what the rest of the Design Team have made for your inspiration.


Tuesday, February 13, 2024

Put Your Best Face Forward!!

 Happy Galentines day to my female followers!!

No I don't have a Galentines or Valentines card to show you (never thought about making one of them) but I do have one for our NEWd challenge at Shopping Our Stash, put your best face forward and what that means is put a HUMAN face on your project. 


Well the AI Girlfriends faces are the most recognizable I have in my stash, and I have lots and love them all. Now I started out with colouring my image and when done I was sorting through some scraps of cardstock and well what did I spy but a 3D embossed floral background and in the same pile was the Happy Birthday to You die cut, BONUS!! don't you love it when the universe aligns things for you?


I added the perfect sentiment to go with the image on the front and layered it on, Yes, another scrap of turquoise cardstock from that pile, I cut it with the postage stamp die to use on the front but saw the embossed piece, well wasn't going to put it back into the "pile" so I used it on the inside. 

I am adding this to:

Snippits Playground ~~ Challenge 473


Seize the Birthday ~~ Anything Goes


Thanks for stopping by today and don't forget to check out the Main Blog and see what the rest of the team have made for the challenge. 


Tuesday, June 20, 2023

Sentimentally Yours....

 A new challenge is happening at Shopping Our Stash!!  Sentimentally Yours, you know what that means we want the sentiment to be up frnt and center and it can take over the whole project. Lots of great large stamps and dies so dig through you stash and make one of them up front and center!!!


Here is my up front and center sentimentally yours card, I had trouble deciding on which one of my large birthday dies to use but chose this one as I know it is a NBUS I have had for many months and never been out of the packaging. Patterned paper and cardstock is pre-covid and the rhinestones are way older than that. 


Here is a side view to show the elevation of the sentiment. I die cut 2 regular cardstock and 2 heavy 110 lb. weight cardstock and glued them together.


Finished inside of the card using a IO sentiment and a couple of pieces of paper.

I am adding this to:

Seize the Birthday ~~ put a sentiment on a banner

NBUS Challenge ~~ #51 Large die never been used before. 

Cardz 4 Galz ~~ #201 Use Dies or Punches

Thanks for stopping by today and don't forget to check out the MAIN BLOG and see what the rest of the design team have created for the Sentimentally Yours Challenge. 


Sunday, June 4, 2023

Happy Little Stampers Christmas Challenge for June.

 How can it be June already? And we are having Summer weather and I am not happy that it is the high 20s and it feels hotter. So what can you do during a heatwave? well here is an idea to cool off ~~ get started on your Christmas/Holiday cards. Make a snowy scene, stamp a snowman, make it into a snowball fight then add it to the Happy Little Stampers Christmas Challenge, If you don't want to use the option of make a scene then just go with the Anything Goes option. 


I love making scenes with cute penguins, adorable gnomes and even a few snarky cats but this time I went for soft and pretty.


Turquoise and Pink are my favourite non-traditional colours for Christmas so I inked the flatter side of a 3D folder with distress oxide inks, spritzed it with water and added regular white cardstock to it and rolled it through the big shot, I loved the way it pooled in spots. I attached it to a turquoise layer and on a white top fold base. To finish it as a scene I cut two stags out of white glued them together flat attached the feet and popped the body of the stag up. I couldn't decide on a sentiment, I wish I had a "peaceful" die cut.


A bit of a closeup to show the 3D effect and how the stag is elevated.

Thanks for stopping by today and how to see your new holiday card in our gallery.


Tuesday, February 14, 2023

Birthday, Brads and a Butterfly

Hello and welcome to Shopping Our Stash's 490 post going "Back In Time" to challenge 49 and repeat it, Anything starting with a "B" so I went with Birthday and Brads and added a super cuter Butterfly to round the "B's" off. I shopped my stash as the brads are ones I got/bought when I was on the Eyelet Outlet Blog in 2017, The papers were all scraps, even the sentiment was one I stamped and set aside. 


As I said everything was a scrap, most was from a card I started and changed my mind. The HB die was cut 3 times, one in heavier cardstock, I added the b&w butterfly to tie in the black layer. All brads are from the Eyelet Outlet 


I added the birthday candle brad to the I in Birthday. Isn't that butterfly pretty.


Finished the inside with a favourite  sentiment and a scrap of patterned paper. 

As I set up to take the photo of my card Toto decided to have an afternoon bath on my chair, I almost sat on her she was so quiet. 

since I used snippits I'm adding this to:

Snippits Playground Challenge #447 ~~ 


Seize the Birthday ~~ Use Your Initials (BAG) went with just "B"


Thanks for looking today and I'm hoping to be back on the Holiday card making soon. Check out the inspiration the rest of the team has on the MAIN BLOG, then dig out your "B" items and add it to our gallery. 


Saturday, January 21, 2023

G Is for GLITTER!!

 G is for Glitter at the Sisterhood of Snarky Stampers so how did Edna do with Glitter today?


Looks like she is well glittered.

To save on getting glitter all over the desk for Toto to roll in as she has to inspect the daily craftin challenge, I used glitter cardstock, it has less shedding.


I cut the fancy lady out of very vanilla and out of some turquoise glitter cardstock and trimmed the dress, hat and  shoes and glues them on the VV base. I added some Star Form glitter dots for a necklae and embossed the black layer with the sequin embossing folder (SU) Then added the glitter meme I found on pinterest. 


Close up of the computer generated sentiment just in case you couldn't read it.


Finished the inside with an impression Obsession sentiment and a bit of glitter cardstock The card is using a premade Silver base with envelope. 

Thanks for stopping by and we are looking forward lots of Glittered cards in the gallery this challenge. Stop by the MAIN BLOG and check out the rest of the design teams cards.


Monday, August 22, 2022

Jingle Belles Challenge take #2

 I was working on the slimline cards for the challenge last weekend at the cottage but there were more pressing items to craft. I'm hoping I can get my mojo back. I have a new crafting desk which of course is not organized as well as it should be, it will take some time to find the right spots for things. It has a hanging file folder drawer that holds my cardstock scraps. Now on to my second mini slimline card for the Jingle Belles challenge.


Since the glitter cardstock was still out I backed the Santa scene die cut with it for a twinkling night sky, I did a partial circle cut to make a navy layer for my image. The white layer was embossed with the Gently Falling folder and does have some star dust stickles on a few of the dots, doesn't seem to show up well. Then it was layered on navy and then a white cardbase,


finished the inside with a large Merry Christmas and a few scraps of the glitter cardstock.

I am adding this to:

Jingle Belles Rock ~~ Slimline Seasons Greetings.

Christmas Kickstart Challenge ~~ #65 Never in a Nativity

Thanks for checking back again, now I have two more holiday cards. 


.


Saturday, June 4, 2022

Shake that Snow Globe and make it Snow!!

 Hello friends, family and followers, it's the 4th of the month and time for a new Christmas Challenge at Happy Little Stampers. I am not keeping up with my Holiday card count so at some point I'm going to have to double up. As always the Christmas challenge is anything goes but there is an option of making a snow globe card/ 


I decided to go the Snow Globe route but not your average one I made a "tourist" type snow globe featuring Santa. I made it into a Mini Slimline card. 3.25 X 6.25


I die cut the globe/scene 4 maybe 5 times out of 100 pound white cardstock and glued them together after that was done I thought hmm was going to cut the insides out of them to make it a shaker, but it was deep enough to add some tiny beads, I then added a piece of acetate and another die-cut. For the backing I found a scrap of inky background that fit the bill. I added the tiny beads and glued the back on the snow globe. To finish the front I dug out some starform sentiments and snowflakes. 


Here is a look at the height of the die cuts.


I finished the inside with a scrap of white and navy with a piece of the background paper and a Impression Obsession sentiment.

Thanks for stopping by today and check out the inspiration the rest of the design team have made. 


Sunday, February 20, 2022

It's a Snippits Kind of Day!!

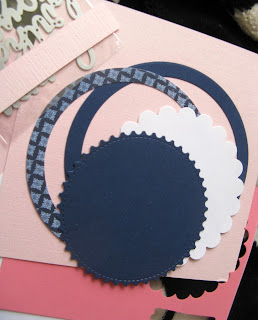
 Hello friends, family and followers surprise I'm not blogging a design team card, I'm playing along with a couple of challenges, yea for me!! First it's using snippits, those off cuts, extra cuts, images you have already coloured, it makes you think outside the box. I have oodles of snippits but rarely enough to make a whole card....here is how it started.


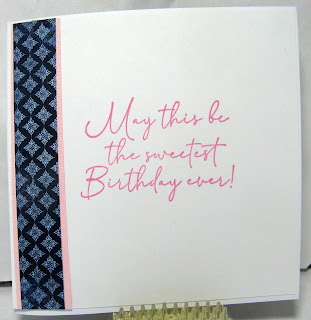
These are my snippits, I made a card a while ago and the circles were too large so I cut them smaller leaving rings that matched together, as I was designing the card I also cut the white scalloped piece and the nave pinked edge, the pink in the background is a perfect size for the base, I also had a few scraps that were used to make a border. Now here is how it all went together.


The die cut sentiment is one I've never used before (NBUS) The card is a 5 1/2 inch square side opening card. 


Finished the inside with some left over scraps and a sentiment from Impression Obsession. 

I rarely find 2 challenges to enter but I planned for all 4.
Challenges I'm adding this to:

Color Hues ~~ #35 Navy & Pink

Seize The Birthday ~~ #233 Dichromatic (navy/pink)


Addicted to Stamps and More ~~ challenge 423 Birthdays


Thanks for stopping by and stay safe, stay healthy.


Saturday, November 13, 2021

Naughty or NIce?

 Hello readers I hope all is well in your part of the country, I hope you are staying in and crafting and staying safe.  Since I missed the last SoSS challenge (life got in the way of crafting)  all my craft supplies are home from the cottage but not in there proper places so it really takes me three times as long to make a a card as it usually would. For the next two weeks the Sisterhood of Snarky Stampers challenge is 

N is for Naughty

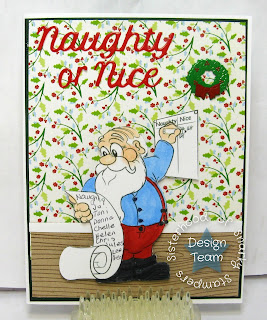
Here is what I made for the challenge.


I used a digi image from Dr. Digi to make my scene, The sentiment was die cut out of a sample shiny red cardstock sample,  I then added an Eyelet Outlet wreath brad, wood floor was a scrap of crumb cake cardstock stamped with Versa fine sepia ink with Stampin'up woodgrain stamp.


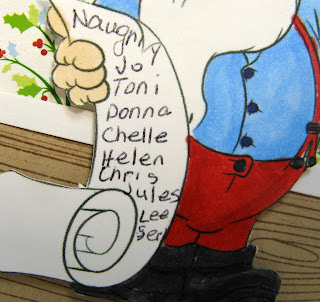
Here is the naughty list, that is Linsey's name at the bottom they Y is missing. 


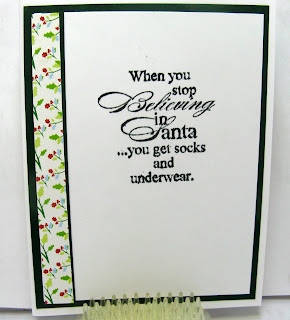
I used an appropriate Stampendous cling mount stamp for the inside 

I'm entering this in;


Alphabet Challenge ~~ P is for Patterned paper 


Thanks for stopping by today and don't forget to check out the rest of the Naughty cards on the