Showing posts with label Tutorial. Show all posts

Tuesday, November 8, 2022

Frills and Flowers and Buttons and Bows!!

 You might get a clue from the "old" song lyric at what the challenge is but I'll explain it just the same  Shopping Our Stash is creating with  "old school" favourites like... Buttons, ribbons, brads,  eyelets something you haven't done in a long while.  I looked through some of my cards and realized I haven't used ribbon in "gasp" over a year and I have no clue why not I have two buckets of ribbon, it all needs re-oranizing. So I picked a 11 inch scrap to use for my card. 


I love this Gina Marie wreath die and use it a lot, in fact made one not long ago in Blue and Silver and I knew I wanted to make a few more in other colours to boost my holiday stash. So other than the ribbon the rhinestone brad is ancient and I found the tutorial on how to make the bow HERE.  The patternd paper is also years old, not sure where I got it or the make it was a package deal. 


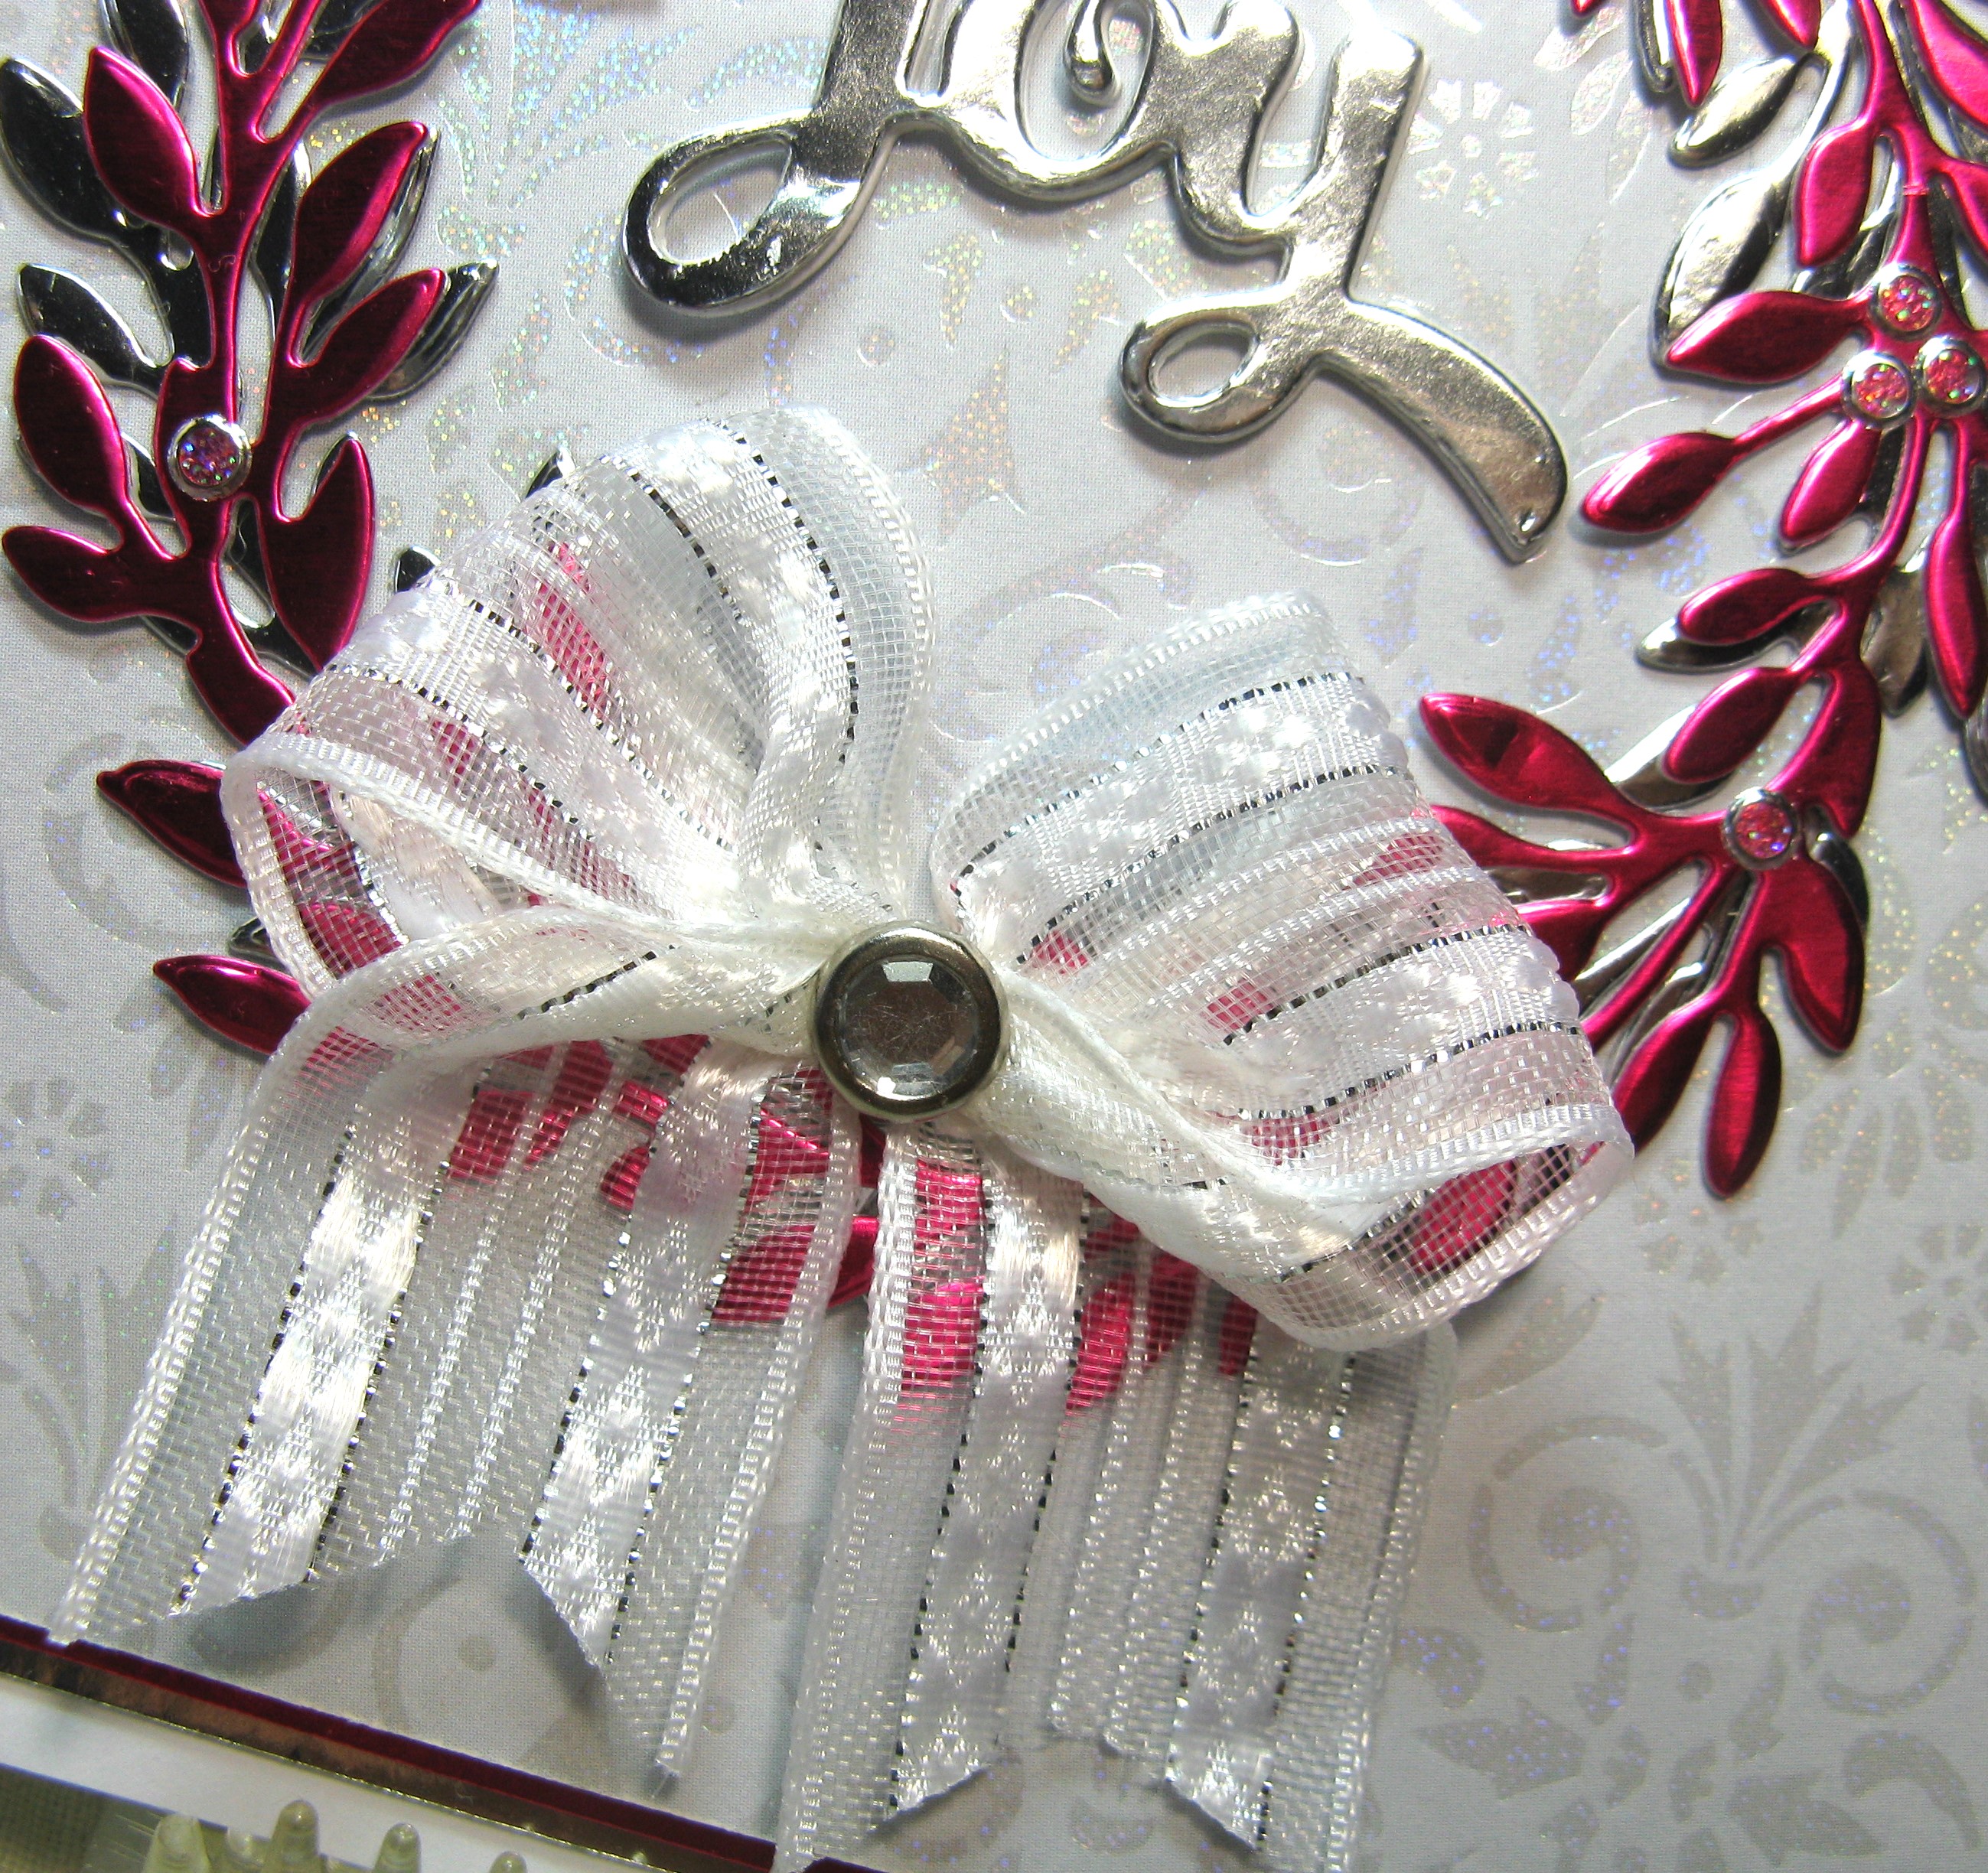
Close up look at the bow and brad. 


Finished the inside of the 5 1/2 inch square card with a favourite Hero Arts sentiment.

Thanks for stopping by today and get out your "old school" stuff and make us a card. Don't forget to check out the Main Blog to see some fabulous old school  "embellies."


Tuesday, June 16, 2020

Tie a Holiday Ribbon On!!

Not as late as normal getting a card done for the Jingle Belles Challenge, When I bring my "things" to the cottage they are always in a jumble, at some point I will try to organize to find things easier, After I finished the card I found the original die I had planned using. Ah still one day left.

First a litttle Tutorial

This is alcohol ink smooshing and how I do it is...cut 2 pieces of shiny cardstock to the size you want, take a large ziplock bag put one piece of cardstock inside, center it and zip it shut. Take what ever colours of alcohol markers you want to use and scribble all over the plastic using the piece inside the zip lock back as a guide when you are satisfied then spritz it with rubbing alcohol and put the shiny side down on the "mess" and lift it up see if it is how you want it, it drys quickly. I think this a fun technique. On to my card.


When I found the background piece knew I wanted to back some ornaments with it. Thank heavens I brought a "stick it" sheet, bought them a year ago at scrapfest and they are working great for sticking intricate dies with no glued fingers. When leaving on Friday for the cottage I threw a few rolls of ribbon in my tote, I used the sheer white 1/4 inch ribbon to hang the baubles and made some tiny bows, the background  was embossed with swiss dots and layered it on a scrap of purple.

Close up of the ornament.


Finished the inside with a couple of scraps of paper and a sentiment from Impression Obsession.

I am entering this in:

Jingle Belles Rock ~~ Tie a Holiday Ribbon On

Happy Little Stampers ~~ Anything Goes with Dies.

Thanks for stopping by today and have a wonderful week.

Saturday, June 13, 2020

T is for Technique at the Sisterhood of Snarky Stampers!!!

Edna stole my colour pallet 

Another Saturday has rolled  around and with this Saturday it's a new Challenge at the Sisterhood of Snarky Stampers, T is for Technique. a few weeks ago there was a challenge and I can't even remember who's it was but it was to make a Herringbone background, well it intrigued me but sadly ran out of time for the challenge but kept in in mind for this challenge. There were a couple of videos that I watched and decided on this ONE the other video I will watch and try it too as it is a bit different.

I bought this paper pad at Walmart before I retired and I have been retired 19 years. I think I've been hoarding it as it is so pretty. My sticker maker made placing of the strips very easy. I used 4 different 12 X 12 co-ordinating patterned paper cut in 1/4 inch strips, now the video said 9 so I cut 9 of each design and I have enough left for at least 3 more cards, next time I must pay attention to the small details. I added a samll sentiment as I really wanted the background to be the star.


The sentiment is from Wine Not from Creative Impressions and has 20 wine related sentiments.

There are many more techniques at the Main Blog when you have checked the rest of the design team techniques find a good one and join us. I am looking forward to seeing something I've never seen before.
Thanks for joining me here today and have a wonderful weekend.

Saturday, March 30, 2019

Rudolph Days ~~ March

I finally have the card made for Rudolph Days for March, I've been working on it for days one little step at a time. I changed my mind 3 times on which image I was going to use then it was the sketch, sometimes thing just don't fall into place right off the get-go.  But here it is with one day to spare.


I bought these super cute mini house mouse clear stamps and it's the first time any of them have seen ink, it was a bit bigger than the die I wanted to use so I "cut inside the box" picture tutorial to follow. 
The sketch is from Mojo Monday.


Finished the inside with a edge die, an inkadinkadoo sentiment that seemed perfect for the image.

Now the tutorial.

first I lay the die down yes it's upside down so I can see the edge, so you know what part is outside the frame. 

Then fussy cut the edges of what you don't want die-cut, then you slide the part you don't want cut over the the die edge, this part will not cut but the rest will.

This is what it looks like after it has gone through the die cutting machine, then you finish fussy cutting the part that is outside the frame.

I hope you can understand, I know at one point there was a video showing how to do partial cutting.

I am entering this in:

Rudolph Days ~~ March 

Mojo Monday ~~ #512 
House Mouse and Friends Monday Challenge ~~ # 287 ATG or Food  & Drink

Thanks for stopping by today and yes I'm still making Holiday Cards.


Tuesday, September 25, 2018

It's Tuesday and a Special day!! Shopping Our Stash has a NEW Challenge.

As I said it's a Special Day, not only is it a new challenge, #363 Smooshing at Shopping Our Stash, it's Rudolph Days, Let it Snow at the Jingle Belles it's my Hubby's Birthday!!! So first things first!!! Smooshing, love the term, in the last little while I have done this technique often, with distress oxide inks especially with winter cards but this time I wanted to do something different so I did alcohol ink smooshing. (how to do it at the end)


The colours are so much more brilliant IRL. I cut the smooshed shiny paper with an Elizabeth Craft Design stitched oval added foam core die cut poppies with a cute hello, both are unmarked. The background is embossed with a cuttlebug asian folder.


Used the off cut from the oval for a layer on the inside. 


This smooshed background was the first I made and it is what I used for the instructions. The die cuts were done with foam core. And the oval was elevated with fun foam.


The sentiment is from Stampendous and one of my oldest cling mount stamps.

I shopped my stash for the shiny cardstock (5 years old or more) Technique haven't done in years either,  everything is from my stash, even the foam core I bought 1 1/2 years ago to make a photo booth and it never was used.

Now on with the instructions.

Inside a large zip lock storage bag I put a sized piece of cardstock, this is for knowing where to put your markers.
Scribble all over the plastic bag with the desire colour alcohol markers making sure you cover all over the area of the inside piece of paper.
Then you spritz it with rubbing alcohol and it swirls together, take your cut piece of shiny cardstock and lay it carefully on  top, don't let it sit too long. lift it straight up, check to see if it how you like it. and it drys really quickly (no waiting) forgot to take a picture of the finished piece (duh) but here is another picture of the card.

I am entering this in:

Jingle Belles Rock ~~ Let it Snow

Rudolph Days ~~ September

Thanks for visiting today and head over to the Main Blog and check out what the rest of the design team have made. Check back on Saturday to see hubby's birthday card.

Tuesday, August 22, 2017

Wood is Good.......

Shopping Our Stash challenge #317....Wood is Good ~~ use wood or woodgrain on your project. Seems a rather easy peasy challenge this time. I have a wood panel background stamp that hasn't seen ink in a while so I was happy to get it inked up. The challenge is timely since I'm really low on cards for men.


I inked the background stamp with versafine sepia and stamped it on crumb cake layered it on some ancient shiny paper then on an Espresso base.  My bluenose stamp is one of my very first stamps and is a PSX dated 1999. I love making the rickrack looking frame for this stamp. There are pictures below how it is done.  I have taken a hint from Jennifer Maguire  to use fun foam on the back of my images I want to raise it makes them much more stable to mail. Check out Saturday's post for pictures.


This shows the elevation you can get with using fun foam to elevate the image. You can see the picture tutorial HERE. on Saturday's blog post.


I finished the inside to match the front and used a favourite Penny Black sentiment.

Here is the picture of how the frame was made.

I use a spellbinders scalloped circle and a spellbinders inverted scallop circle for the frame. I then turn it over and dry emboss the frame with a rubber mat and the plates.


Thanks for visiting today and we would love to see your wood themed project. Remember to check out the "wood" projects the rest of the design team have made.

Saturday, August 19, 2017

Something old, Something new, Something Borrowed and Something Blue!!

Have you guessed the challenge #91 at the Sisterhood of Snarky Stampers is.....W is for Wedding and we want to see  something old, new, borrowed and something blue on your project.  I went with my favourite married couple...Stella and Gus and their views on marriage a bit snarky too.


As you see my colour choice is blue and the patterned paper is OLD, the postage stamp die is the new part and (stretching it a bit) the borrowed is the current Stella says Sketch #513.
The sentiment is also from Bugaboo stamps, I borrowed it from the other Stella & Gus marriage digi.


Close up of the two love birds. 


Finished the inside with the sentiment that came with the front image of Stella and gus.  You have to love their snarky humour.

Now a picture tutorial on how I use the fun foam instead of pop dots, it makes the image more stable for mailing and doesn't add much weight.  I found this out from one of  Jennifer McGuire's  videos.
First I cut the shape I need just a bit smaller than the image.
then I glue or tape it to the image and glue and tape to the card base.  Just a word of caution don't buy the fun foam at the $$ store in a package it is too thin buy the 2mm singles, I did get some at Len's Mills today. 


I'm entering this in:


Thanks for visiting today and head over to the Snarky stampers to check out the rules and see what snarky goodness the rest of the team and the Queen has made for the challenge.

Tuesday, November 29, 2016

Shopping Our Stash #280 ~~ Paper Strip Art (Use the Bargello Technique)

What a great technique ~~ Bargello I found my tutorial on Splitcoast Stampers.  Shopping Our Stash  would like to see your take on the Bargello technique. My first attempt was very sad but I will post the card I made with it, (I read the technique but didn't use the right dimensions) Here is my card with a picture tutorial below it.


As you see I didn't want to cover it up with an image.


First pick out 3 co-ordinating patterned papers 6 inches in length and cut at at least 2 of each 3/4 inch wide.
Decide on which order you would like.
on a 5 X 6 inch light weight cardstock glue the strips in the order you decided.
I ran my 5 X 6 piece through the zyron sticker maker, made it a lot easier.
Now you cut strips alternating 3/4 and 1/2 inch pieces (because of the words on one of mine I kept them in order. 

Another 5 X 6 light weight piece of cardstock (ran it through the Zyron)
now glue the strips in any pattern you would like (there are many to pick from)
Here is what mine looked like when it was finished before I cut it to make the card.
I hope this tutorial is helpful and you will give it a whirl
Close up of the design.
Finished the inside with the off cut from the front panel, loved it so much just couldn't waste it.
And now for my first attempt.

This was very stash busting as all the patterned papers from my scrap box along with most of the coloured cardstock. Thanks for bearing with my long blog post. Don't forget to slip over to Shopping our Stash and check out the way the rest of the design team have played with the challenge.


Tuesday, April 21, 2015

Clear it Out Tuesday is celebrating Mother’s Day with Flowers

The challenge at Clear it Out Tuesday is to make a Mother’s Day project and the stash is Flowers. Our very own Laura is the sponsor for the challenge this week, $10 GC for the digi store of your choosing.  I know which one I would pick, what about you? Well in order to win you have to enter so head to the blog for the rules and check out the rest of the design team’s projects.
IMG_2839
The image I used is from Ching-Chou Kuik  I just love her images, there is also a Facebook fan page. I used my favourite colours, purple and pink. The frame was made with three copic markers and shiny paper. You cut two pieces of shiny paper the same size, one you put inside a large zip-lock baggie, (in the center and zip closed, then you take the alcohol markers and scribble all over the plastic bag, covering the piece that is inside the bag. then spritz with rubbing alcohol and put your other piece of shiny paper down on the “mess”  pick it off and let it dry.
IMG_2840
Close-up of the image.
IMG_2841
This shows how beautiful the technique is and I didn’t want to cover it up so just put the sentiment right on the oval off cut from the frame on the front.
I would like to enter this in:
Ching-Chou Kuik April Challenge
Thanks for visiting today and you know Mother’s Day will be coming up soon so get your Mother’s day images and flowers together and join the challenge at Clear it Out Tuesday.

Saturday, March 14, 2015

How about a little St. Patrick’s day Treat?

I usually make treats for the ladies at our bowling league and I was so busy at Valentine’s I missed making treats for them so decided to make some for St. Patrick’s Day. I bought a bag of Lindt candies at Winners a couple of weeks ago, they were just a small treat so made a match book holder. Since I was making 30 of them I needed it to be simple so I made my own design. Measurements will follow.
IMG_2745
Here are 6 of them, I used my St. Patrick’s day Fluffles Stamp of course it is the only one I have.
IMG_2746
the cardstock measures 6 1/2 X 2 inches and scored at 1/2 inch 3 1/2 and 3 3/4.  Fold up the 1/2 inch section and I used some score tape but it really didn’t stick well with the pressure of the flap so put two staples in along the bottom. There isn’t really a lot to do although it needs a sentiment and I don’t have a St. Patrick’s day one.
IMG_2747
Here is the creamy chocolate treat I taped to the inside -
IMG_2748
Side view of the holder.
Thanks for stopping by today and come back again soon, you are always welcome.