Tuesday, September 27, 2022

Leaf Me Alone!!

 Challenge #480 at Shopping Our Stash is Leaf Me Alone so we want to see Leaves on your project. I did some shopping my stash when I used some photo papers that I bought at a yardsale for 50 cents, they work great for alcohol inky backgrounds. Now my IO die set has been in a drawer for hmmm over 4 years never opened never used until now. First here is the inky sheets I made.


I made 4 sheets of the inky backgrounds. I have a extra large ziplock bag with a piece of cardstock zipped inside then scribble covering the bag with the cardstock as a guide, then spritz with rubbing alcohol and put the photo paper down on in (shiny side down) and pull it up it dries really fast too. When I got the bag out of it's "safe" place and started working I noticed a whole lot of teeth marks all over the one end of the bag, guess my hiding spot wasn't safe enough from my helper.
 

I dry embossed crumb cake cardstock with a fall embossing folder, "something" swirls. layered it on an Early Expresso mini slimline base, added a strip of brown to attach the leaves to and a vertical Happy Birthday diecut. This just might become my youngest grandson's card.


Closer look at the leaves and the EF.


Finished the inside with very vanilla, scrap of early expresso some extra leaves and one of my very first Hero Arts birthday sentiments. (very loved too)

I did finish the "A" planned card, what else would I do with mega leaf die cuts?


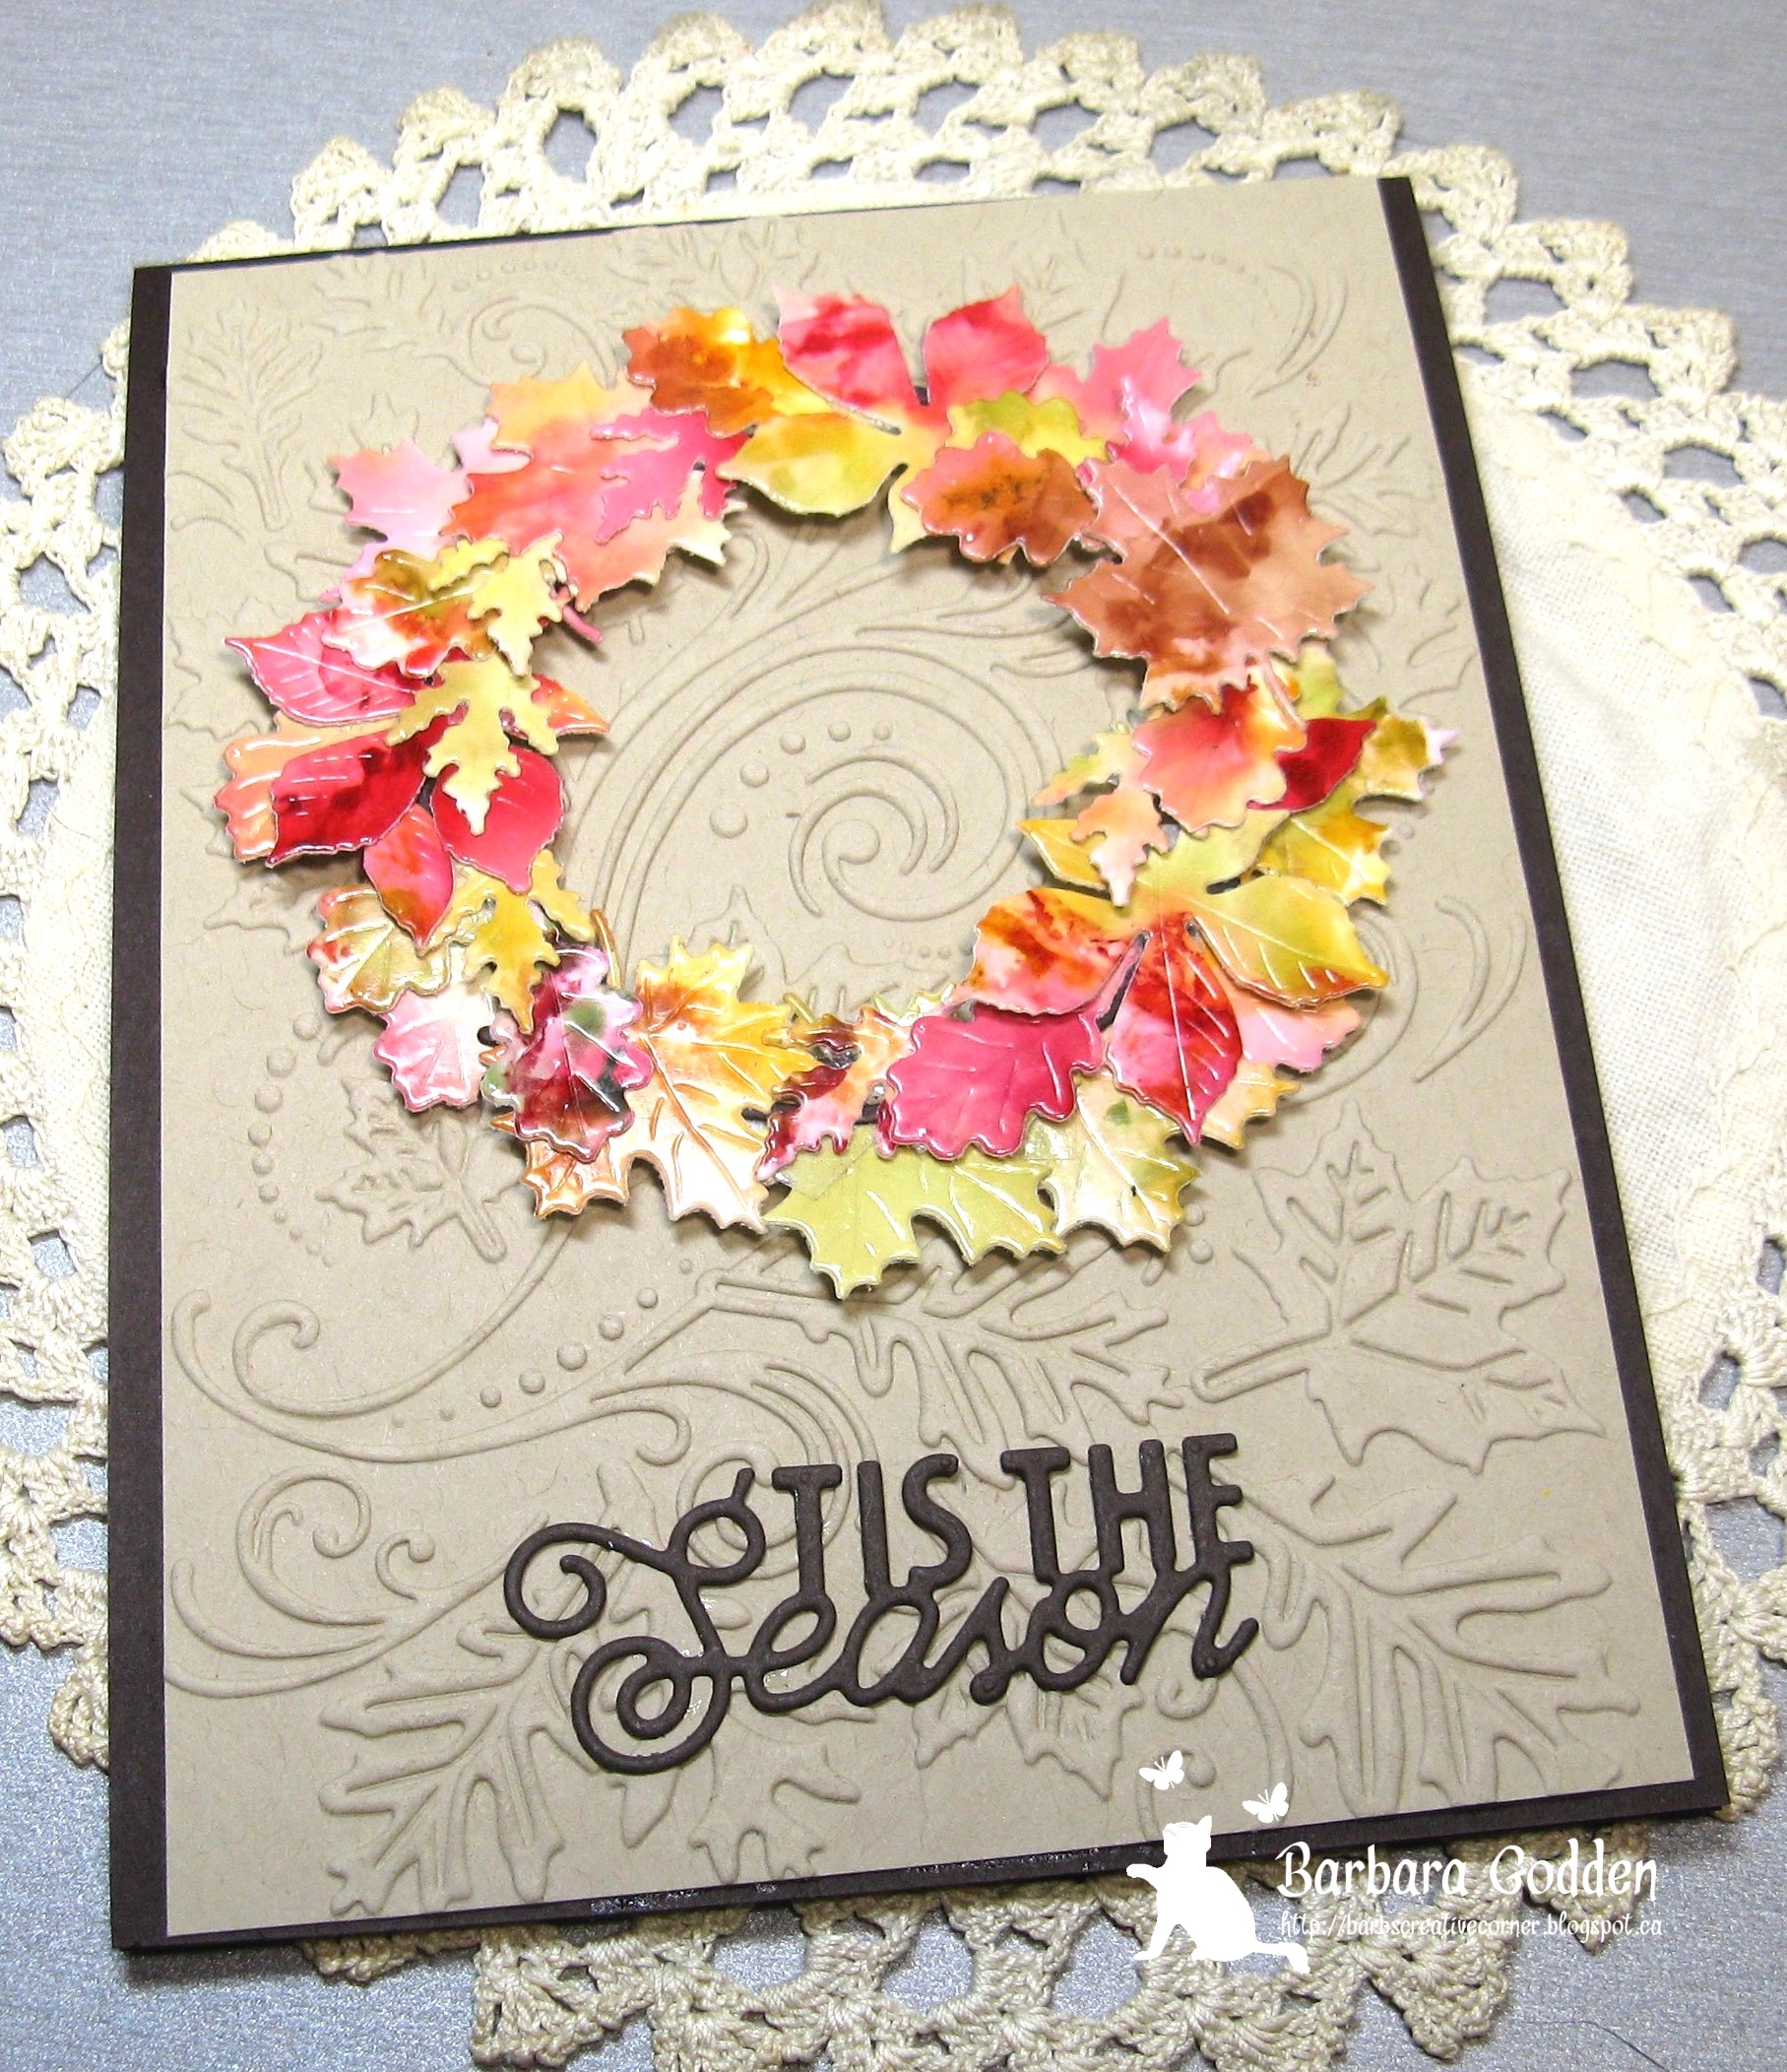
I used the same colours, leaves and embossing folder made a top loading A2 card. I attached the leaves to a circle and popped the whole circle up, the sentiment is an Impression Obsession die I've had for a while and never used it, 


Closer look at the wreath of fall leaves.


Inside of the card I thought it would work for a Thanksgiving birthday, The circle is the large one from Elizabeth Craft Designs, I used the smaller one for the front then covered it up. Very vanilla cardstock and Versafine Sepia ink for the sentiment. 

Thanks for completing the marathon of picture, glad you made it, now head over to the SOS Blog and check out the rest of the design team's projects. 


Thursday, September 15, 2022

A Tiny Craft (ATC) Challenge ~~ September

 How can it be the 15th of September already? Wasn't labour day just a few days ago? Fall has been beautiful but sadly by the time the October challenge arrives I will have closed the cottage and all my time can be spent in my craft space.  My new to me desk i
working out great, it needs organizing but when I make a card I put it on the top shelf (keeps it safe from "paws")  Since it is the 15th of the month it's a new challenge at A Tiny Craft (ATC) Challenge and the theme is SNARKY!!  I paired stamps from Riley & Company with Chris's sentiments from Stamplorations, added cardstock layers an embellishment and voila they are done.


Since these are retro stamps I went totally retro with Black and White. The "enamel" dots are the last of my homemade black ones. layered the images on black then on a white base added the sentiment and called them done. 

Here is the close up of the individual ATCs.


This is Coffee Lady


This stamp is called Coffee Carl


This Retro stamp is Wondering Midge 


Lastly this one is called Ethel

There are many many more Retro Funny bone stamps in their store. 

Thanks for stopping by today and check out the main blog to see what the rest of the design team have made. 


Tuesday, September 13, 2022

Hey (h) Ombre!!

 It's time for a new challenge at Shopping Our Stash #479 Hey (h) Ombre, there are a few ways to do an Ombre effect on your project as you will see when you head over to the main blog, paper, ink blending, paint chips, you can do a background or use the technique on your image. I went the easy way as my plan "A" didn't work, but as with all crafters I have saved my "fails" and will use them, I even have ideas but it just wasn't working for me today. So plan "B" I dug through my stash and found some ombre glitter paper and made a Gah Pink Christmas card.


Pink cardstock from my stash, 2 piece snowflake die, gently falling embossing folder (SU) and it's a Mini Slimline card. 


I added two layers of heavy cardstock behind the snowflake and two extra JOY die cuts to elevate both, the Joy die is from Elizabeth Craft Designs 


Finished the inside with some scraps and a very (probably one of my first) Christmas sentiment stamps from Stampabilities 2005.

Since I mentioned Plan "A" earlier I finished it still not 100% but my "critics" think it's great. 


The Sunflower die was a fund raiser for the Ukraine, I used a couple of yellow oxide ink pads and made the ombre cardstock to cut the  Sunflower from and two green oxide ink pads for the leaves and stem (that shows, the background was a very old sample of smooshing that was in my stash and the brown frame too. The front sentiment Stampendous. 


Sentiment is from Impression Obsession. 

Thanks for stopping by today and head over to the MAIN BLOG and check out the ombre effects the rest of the team have made


Sunday, September 4, 2022

Happy Little Stampers Christmas Challenge ~~ September

 Another month has rolled around and it's time for the next installment of HLS Christmas Challenge, the theme is always anything goes but the option this month is Metallic. 


I have a stash of metallic posterboard that I bought at Dollar Tree, I'm glad I have a stash because they no longer carry it. I love metallic on Christmas cards but it is so hard to photograph. So here is my metallic card for the challenge.


I cut my squares of metallic posterboard to the size I needed for a 5 1/2 inch square card and using the wreath die from Gina Marie Designs I cut one from each piece. These were all attached flat. Peace was cut from the blue and several layers of heavy white cardstock to elevate it (hand deliver only card). 

I think I'm going to make a few more of these in some of the other colours, there is a beautiful green and the one that is supposed to be red is more pink but looks great. I also have Gold although that one is used more. The inside of the card is finished but there was a spot in the sentiment that stamped badly (guess I wasn't paying attention that day) it's very noticeable in the photo. Since I'm on a timeline to get done I will fix it later.

Thanks for stopping by today and you know you need to get working on your Holiday cards so stop by to the main blog and enter, it's anything goes with an option. 


Saturday, September 3, 2022

B is for Birthday

Summer is winding down and my time at the lake will be put on hold for the winter, it's nice to have a change of scenery for the summer and I love taking the pictures down at the break wall. Well this week I didn't get done in time to use the lake as a backdrop, in fact I think I left my camera there and I have no recollection of packing or not packing it. I have been toting a bag of things back and forth so when the end of September (I have to close early this year) comes I won't have 5 boxes of supplies there. I still haven't managed to make up kits to take so I have everything I need as this past trip I took Christmas patterned paper pads but nothing to make the birthday card with. Without further adieu here is the challenge graphic.


Edna is celebrating a birthday and I'm sure the ginger kitty has been licking the icing.


It's a rather busy background but taking pictures with my camera and then sending them to myself was very stressful, by the time I saw the picture I just couldn't do it over for a third time. Of course I used my AI girlfriends and a sentiment from a set of snarky birthday sentiments which has no label. Patterned paper is from Dollarama as well as the floor planks, I added a white strip to look like a baseboard. 


Finished the inside with scraps of leftover papers and a sentiment.

I'm adding this to:

Seize the Birthday ~~ Anything goes


Thanks for stopping by and head over to the MAIN BLOG to check the rules for entering and to see what projects the rest of the team have made.