Tuesday, January 31, 2023

SOS#489 Love is in the Air

 Now is the time to get those Valentine cards made since the new challenge at Shopping Our Stash is Love is in the Air, now if you don't make Valentines there are other options like Wedding or Anniversary. I decided to make a "Sheetload" using the January 2023 instructions from Crafty Al, if you subscribe to her you tube channel and ring the bell you can download the PDF for free. I had never done anything like this before but it was easy to follow.


This was the test card just to see if everything worked. The instructions made 8 mini slimline cards with two pieces of 12 X 12 patterned paper and 8 pieces of 8 1/2 X 11 cardstock. I stamped, coloured and fussy cut 8 snarky cats added a metallic heart and the sentiment is computer generated. Look I'm in the 21st century LOL.


Close up of the snarky cat.


Finished the inside with a favourite sentiment that is generic 

I went on to make 7 more cards the recipients have hopefully received them by now. The Sheetload instructions make 8 mini slimline cards, 4 of each of 2 designs and if you use double sided coordinating patterned paper you would get 2 of each. Here ar the two designs.


The patterned paper is from a 12 X 12 paper pad I bought hmmm 3 or 4 years ago at Dollarama for $4. I like to use the 100 pound cardstock from Michaels for the bases but you have to have the force of the Hulk to crease it. The shiny hearts we cut from scraps.


Here are the 8 mini slimline "Galentine's Day" cards which by the way is February 13th.

The stash I used was mostly from before the pandemic the newest item was the sheetload skeetch. 

Thanks for stopping by today and head over to the MAIN BLOG and check out what the rest of the team have made, then dig in your stash and make us some "love" cards. 


1

Thursday, January 26, 2023

It's Rudolph Days ~~ January 25 to January 31.

 Keeping with my "list" I made a card for Rudolph days, I managed to get 5 holiday catds done in January. I need to keep up so I have enough cards for everyone in December. Rudolph days you only post 1 card on the Challenge.


First time using the wreath die, it also has a circle die so you can cut the wreath out. I used blue metallic poster board and white shimmer cardstock for my layers and a lovely bow die cut with a starform glitter dot in the center.

I am adding this to:

Rudolph Days ~~ January

Thanks for visiting today and you still have time to put your holiday card in for Rudolph Days 


Wednesday, January 25, 2023

I'm still Jingling along with the Jingle Belles!!!

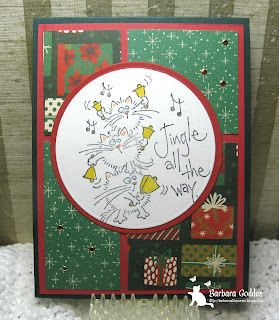
 I have to really hurry with this blog post there is only one hour left before the challenge ends, now if Windows hadn't decided to update then had an error, had to redo it 3 times I might have been at least an hour earlier. So in keeping with my two cards for each challenge I squeezed this one in. I decided to try Crafty Al's Sheetload of Cards tutorial, I used May 2020 and it will make 12 cards but I only wanted one and there are directions for just one. 


I used Fluffles Jingle all the Way stamp from Stampendous, love my Fluffles stamps, I have one for almost every occasion even the Red Hat ladies. Along with the sketch I added some red starform glitter stickers.

Ch

Close up of the super cute image and check out the sticker dots.

I'm adding this to:

Jingle Belles Rock Challenge ~~ Christmas Bells those Christmas Bells.


Thanks for stopping by today and check back tomorrow as it's Rudolph Days.


Saturday, January 21, 2023

G Is for GLITTER!!

 G is for Glitter at the Sisterhood of Snarky Stampers so how did Edna do with Glitter today?


Looks like she is well glittered.

To save on getting glitter all over the desk for Toto to roll in as she has to inspect the daily craftin challenge, I used glitter cardstock, it has less shedding.


I cut the fancy lady out of very vanilla and out of some turquoise glitter cardstock and trimmed the dress, hat and  shoes and glues them on the VV base. I added some Star Form glitter dots for a necklae and embossed the black layer with the sequin embossing folder (SU) Then added the glitter meme I found on pinterest. 


Close up of the computer generated sentiment just in case you couldn't read it.


Finished the inside with an impression Obsession sentiment and a bit of glitter cardstock The card is using a premade Silver base with envelope. 

Thanks for stopping by and we are looking forward lots of Glittered cards in the gallery this challenge. Stop by the MAIN BLOG and check out the rest of the design teams cards.


Tuesday, January 17, 2023

Time for a New Challenge at Shopping Our Stash!!

 It's Snow Much Fun at Shopping Our Stash for the next fortnight, the theme is Winter Fun and what is more fun than a "Gruffie" sledding in a bathtub? 


This challenge I fell into a trap that I'm sure a few design team members have fallen in...designing and blogging the wrong challenge, good thing is I have the next one prepared but that left me scrambling to make a card for the current challenge. That in itself is traumatic but in the wee hours of the morning I woke with a back spasm, pain cream, magic bag and muscle relaxers but it wasn't enough to calm it down. I struggled with sitting, so in spurts I stood at the desk and got it done but took most of the day.  Well as I said it's a Gruffie stamp from House mouse designs, watercoloured background, I fussy cut the image and popped up his hat.


I finished the inside with a Hero Arts sentiment.

Thanks for stopping by today and this is holiday card #5, I'm on  a roll.


Saturday, January 14, 2023

Christmas Bells Those Christmas Bells

 I'm starting this one early, hoping to get one more done in the next 10 days and keeping my mind on my New Year's list. It sure does take me  along time to make one card, I did have the assistant helping (not). I have a plan devised, I will leet you know if it works.


Impression Obsession jingle bells and sentiment they work so well for a slimline card, I used distress inks for te background, and the montage of die cuts were from the off cuts bin. 


Close up at my collage attempt.


Finished the inside with a Hero Arts sentiment and a couple of extra bells and more  from the off cuts bin.
I am adding this to:

The Jingle Belles Rock Challenge ~~ Christmas Bells Those Christmas Bells


Thanks for visiting today, have a crafty day.


Wednesday, January 11, 2023

Thank You, Santa....

 As I said on my last post I want to try to make a card a week for each of the Jingle Belles challenges which will give me 48 Holiday cards, I'm hoping to spread it to one a week and not entering in the last 2 hours. 


I used the second of my large focal point dies I (Santa) bought for me before Christmas, my recent purchase is still in transit or might be at the community mail box but it's way too cold to venture for a walk. As you see the red mirror paper was out and used for the second card, I did cut two more to glue to it to elevate it. the holly was for a project last year but surfaced just for this card I did do a bit of snip, snip on it, The paper is again from Dollarama (I bought 2 of each of 3 pads) 


The inside was finished with the Hero Arts Vertical sentiment, a scrap of patterned paper and the last little snip of the holly. 

I'm adding this to:

The Jingle Belles Rock Challenge ~~ What did Santa Bring You


Thanks for stopping by today and a NEW Jingle Belles Challenge starts on Friday, so stay tuned to see if I am fulfilling my New Year's item 1 on the list. 


Tuesday, January 10, 2023

What did Santa Bring You?

 Hello there and welcome to my first Jingle Belles Rock Challenge card!! I don't make New Year Resolutions but I do have a list of things I would like to work on for 2023 and first on the list is "make more Christmas/Holiday cards" so first up is for the Jingle Belles. I was really at a disadvantage today as I had to clear my table from the Pajama card and as always a clear table requires my helper (picture on the right) to inspect the area, many, many times as I was getting all parts together. I found no pawprints on the cardstock.


Very simple card, the plaid paper is from Dollarama (last year) the Santa hats were already stamped and coloured I just had to fussy cut them and they are popped up. The plaid is layered  on black and then on a white base. The metallic Ho Ho Ho was layered on a second die cut. I love plaid have trouble not to use it on every card. 


Finished the inside with a couple of banners made from left over paper, the paper size is 6 1/2 X 4 1/2 so there is very few scraps. I added the Hero Arts vertical sentiment that I stamped in Memento red.

Of course I'm adding this to:

The Jingle Belles Rock ~~ What did Santa Bring You
Check out the new Header!!

There are a few more items that "Santa" (I'm my own best one) brought me and some that are still in transit, if I can I'm going to try to get another one done, as per my "New Year's" list of making 2 Jingle Belles cards every challenge thus giving me 48 cards. So if it is your goal to make your holiday cards early this is the way to do it.

Thanks for stopping by and stay tuned there might be another one tomorrow. 


Saturday, January 7, 2023

R is for Reindeer

 Hello crafty peeps and Happy New Year, I hope you had a great weekend and are ready to tackle the Sisterhood of Snarky Stampers first challenge of 2023!!! 

Edna doing her best rendition of a Reindeer driver...is that Santa's hat she is wearing?

I went with a Bugaboo digital image I had already printed and made a mini slimline card, my card is 3 1/4 X 6 1/4 only because I have a box of envelopes that fit that size perfect (note to self ... not one cm larger either) Also on my card there is no snark, I did try but when I realized I needed one to put cash in for the great grands I figured snark was not necessary. Love this size for that reason, fits a cheque too, if you still have some. 


This digital set is so cute and can be used many ways, I can see a photo strip slimline card, I can see it used for selfies, now to remember this when any of those challenges come up. Patterned paper is from packs I bought last year at Dollarama and perfect size for a mini slimline at 6 1/2X 4 1/2.


Finished the inside with the 4th block in the set and some scraps of patterned paper.

Thanks for stopping by to see my first SoSS post and now head over to the MAIN BLOG and check out the great and snarky project of our design team and featuring one of our regular player who was crowned Queen, Stephanie. 


Tuesday, January 3, 2023

It's Pajama Day!!!

 Hello friends it's time for a new challenge at Shopping Our Stash and it's Pajama Day, we want to see a project inspired by your Pajamas. It was a tall order for me, I have one pair of very ancient (well it is shopping our stash) pajamas, being from Canada I only wear them on a "snow" day that we have been advised to stay home.  So here is a picture of my very well loved 'jammies. 


These were my inspiration, it was a long process as I have skating mice, skating bunnies, skating penguins but do I have a skating bear? Nope so found a free digital image to use and this is my card.


Talk about shopping my stash, I don't usually emboss a lot but since my white ink wasn't "inky" enough I had to go etehe versamark watermark route using 2002 snowman/snowflake 6 piece set from Hero Arts, and my embossing  powder was from PSX.  The bear was coloured and fussy cut and popped up.


Closer look at the happy skater.


Finally the inside which I decided to heat emboss the sentiment which is years old and from High Hopes Stamps and  since there is no packaging I'm thinking somewhere between 10 and 15 years old..

Thanks for stopping by today and I hope you will use your pajamas as inspiration and enter the challenge, be sure to include a picture of your pajamas. Don't forget to head over to the Main Blog and check out the jammie cards the rest of the design team have made.